Friday, September 24, 2010

Reproduction Postcards: How to Spot the Copies from the Real McCoy

by Bonnie Wilpon (09/20/10).

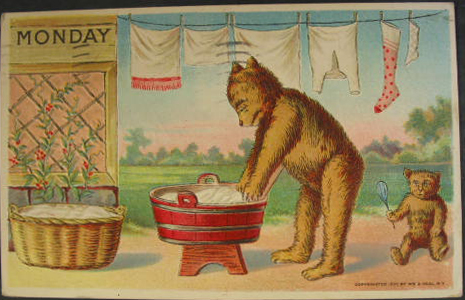
This vintage card shows the publisher’s copyright at lower right.

Postcards, like many other antiques, can be reproduced, and some repros are very hard to spot. Since one of the primary factors in a postcard’s value is its age, repros have little monetary value. In spite of that, they may be desired by some collectors due to their subject matter. Like fine art, some cards are so costly that collectors can’t afford to buy originals, and may settle for repros just to have the images in their collections.

For example, vintage postcards of Kewpie dolls generally start in the $50 range. but cute repros can be had for under $2. Sets, such as Days of the Week, continue to be popular with collectors and with folks who use them for correspondence, and repros are popular.

So what are the telltale signs of reproductions? Often, pre-1920 greetings, now out of copyright, are reproduced by reputable printing and stationery firms.

For example, take the Bear Family Days of the Week cards, which originally published by Heal’s, circa 1908. The Monday card, showing laundry day, is an original. You can see the publisher’s mark in the lower right corner.

In an original postcard, the front and back sides match in terms of era.

Like the Easter card shown, both the front and the back sides show signs of pre-1920 markings. The back side of this Easter card shows embossing, as well as a pre-20 stamp box and vintage publisher’s logo.

On the other hand, the back of the Tuesday “Ironing Day” card, is a clear reproduction from Merrimack. This reputable publisher notes “Replica of the Antique Original” on the top of the address side, and shows its name and zip code (a clear indication of post-1963 publication) at the bottom.

This repro is clearly labeled as such by the publisher.

What if this repro was from a rogue source and didn’t include those clear signs? One clue is the brightness of the green printing, which we don’t see on pre-’20s cards, since the colors used on the back side were much more muted back then. And, look at the stamp box: pre-’20s cards never had the single word “stamp.”
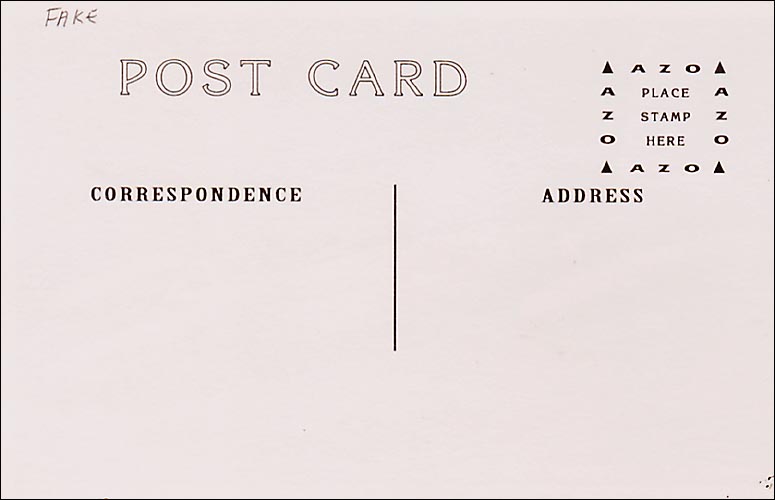
This card shows a real photo back.

But the front is a printed reproduction of Thunderjet.

The black-and-white Republic F-84E Air Force Thunderjet is a reproduction as well. The postcard is clearly a printed card, which is evident from its finish. Under magnification, you can see the dot pattern that characterizes Moderns. Yet, the back side carries an AZO Points Up stamp box, indicating a Real Photo card published between 1904 and 1918.

The popular Linen-era cards are being reproduced as well, and even long-time collectors have been taken in, recognizing some of their “great buys” as repros only after examining their purchases carefully at home.

Below, we see a composite of two linen cards that have been reproduced. The top card, the Life Guard Station on Jacksonville Beach, FL, shows very muted coloration. Most Linens are bright—even garish—but not this one, which was the first clue. Additionally, this card is lighter in weight than the typical Linen. It just doesn’t have the “heft” that it should.
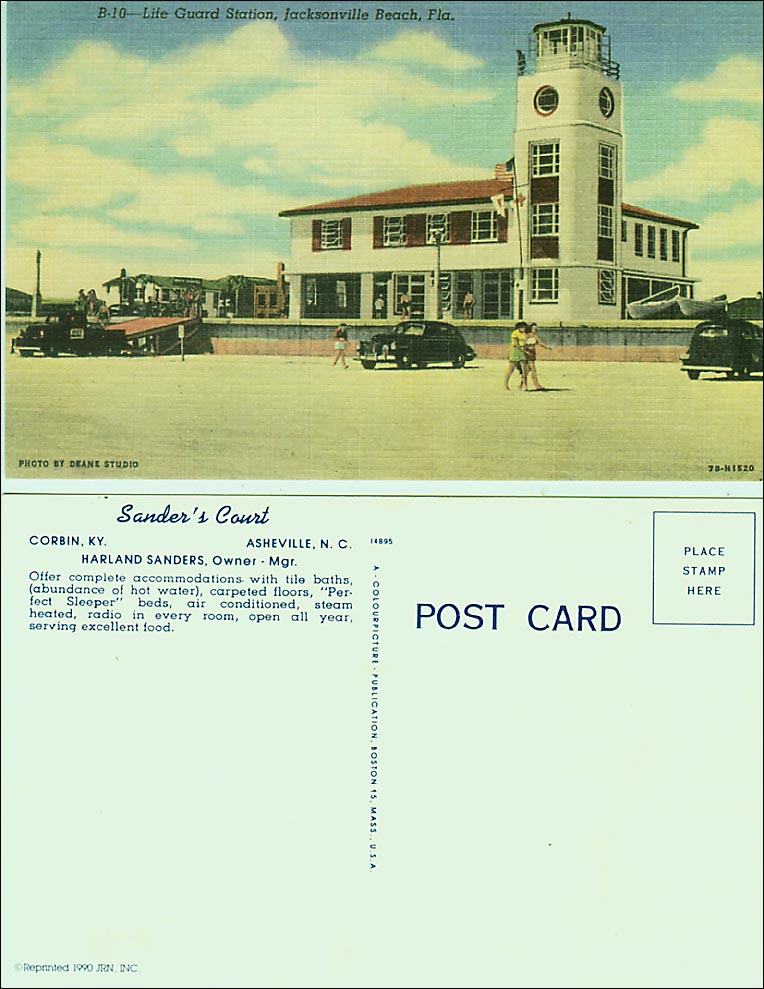
Linen cards aren’t immune from reproduction. Check the backs carefully, note the “heft,” and examine the coloration of the image for fading.

The back side shown here is from a postcard of Sanders Court, the 1930s motel venture by “Colonel” Harland Sanders of Kentucky Fried Chicken fame. The original Court/Café in Corbin, Ky. was demolished in the late 1960s, making this a collectible subject.

Tougher to spot as a repro, the back side looks vintage, including the original Colourpicture publisher’s mark and stock number. But closer examination shows, in 5-point type at the lower left, a note saying “Reprinted 1990.” Like the Jacksonville Beach card, the color saturation of the image and the “heft” were clues.

This is a real Linen card. It “feels” like it’s genuine.

Other reproductions are almost impossible to illustrate, because they’re so well done. One unscrupulous trick is to literally glue a reproduced image to another postcard – one that truly is vintage, so the back side appears to give it the authenticity of a pre-20 or pre-1908 card. In this way, a forger can turn a worthless common vintage card into a sought-after busy street scene.

It’s easier to unwittingly buy a repro through the Internet because you can’t actually examine and touch the postcard. But even at shows, repros can end up in your bag if you’re going through cards quickly—especially when they’re encased in plastic sleeves, which dull the image slightly and disguise the postcard’s weight.

Reputable dealers will mark cards in their stock as reproduction if they’re aware that they are repros. Sometimes, in their hurry to mark and sleeve a large collection of cards they’ve purchased, they’ll miss one, though. I’ve seen dealers at shows get the opinions of other dealers as to whether a skillful repro is an original or not when they’re in doubt themselves.

The moral of the story? Examine postcards very carefully, front and back. Read all the fine print. Pay attention to the “feel” of the card and the appropriateness of its colors to the era. Make sure the age signs of both sides of the card match each other. If you’re in doubt, ask the dealer to help you examine the postcard more closely.

Bonnie Wilpon, the author of “Postcard History of Sarasota and Bradenton, FL,” and “Postcard History of Hollywood, FL.” (published by Arcadia Books), is a Worthologist who specializes in postcards.

————————————

WorthPoint—Discover Your Hidden Wealth

Share

Share

Antique & Collectible Extravaganza

Event Detail

Antique & Collectible Extravaganza
Spence's Bazaar
Dover, Delaware (DE) 19901 United States

On Sunday, Oct. 3, 2010, the fourth Delaware Antique & Collectible Extravaganza—Del Mar Va's largest free outdoor antique and collectible show—will be held at Spence's Bazaar, 550 S. New Street, Dover, Delaware, 19901.

Antique and Collectible dealers from up and down the east coast will be offering a wide variety of merchandise sure to please enthusiasts and shoppers with varied tastes. Vintage furnishings, artifacts, jewelry, porcelain, ephemera, glassware, advertising, dolls, furniture, trains, pottery, music, sports, auto, memorabilia, collectibles, toys and much more will be featured.

Admission to the show is free. Gates open at 10 a.m. show runs till 4 p.m. Food will be available and free parking, Vendors space is still available call and leave message. For more information on attending or participating in our shows, go to our new web site: www.toyshows.org or www.myspace.com/toyshows.org call our phone line: 856-302-3606.

Where:
Spence's Bazaar
550 S. New Street
Dover, Del. 19901
When:
Sunday, Oct. 3, 2010
Hours:
10 a.m. – 4 p.m.
Admission:
Admission Free
Information:
Phone: 856-302-3606
Web site: http://www.toyshows.org/
E-mail: toyclicker@aol.com

The Collector’s Minute: Ellis Maple Dolls


by Mike Wilcox (09/20/10).

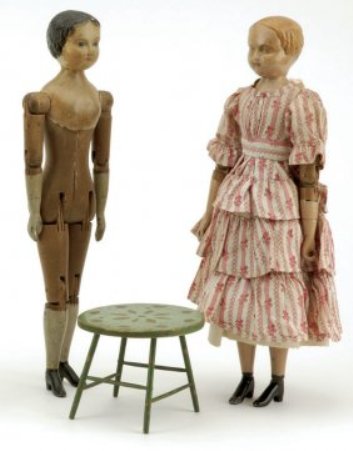
Ellis dolls, with heads of steamed and pressure molded maple and bodies of turned maple, used a patented joint system, each joint using a friction fit split mortise and tenon.

Identification of dolls can be difficult, hindered by the fact many are unmarked, some manufacturers made parts for other doll makers and the market has generated a lot of reproductions. What can help though is learning some characteristics that are almost unique to certain makers, such as in the case of the dolls created by the Co-operative Manufacturing Company of Springfield, Vt.

The company was founded by Joel Addison Hartley Ellis (1858-1925) in the early 1870s. Ellis’ operation started out in1856 as a woodworking shop for the manufacture of doll carriages, baby carriages, sleds, carts and wagons.

Ellis dolls, which were made circa 1871-1873, had features that are almost unique: the heads, unlike most of the period are not china or wax, but end grain maple, steamed and pressure molded; the feet and hands were cast metal; even the bodies differed most Victorian dolls, in that they were turned maple and not stuffed kid or composition.

Another feature that differed from most Victorian dolls is that the Ellis dolls used a patented joint system, each joint using a friction fit split mortise and tenon. This system allowed the doll to be posed in any number of positions.

Ellis dolls came in 12-, 15- and 18-inch sizes, but based on surviving examples, the 12″ size must have been the biggest seller. The Ellis dolls are very collectible and, if in good condition, rarely sell at auction for less than $300.

What is My Antique Worth? Simplifying Appraisal Values

by Liz Holderman (09/14/10).

Did you know that a single item can have several different appraised values? In fact, when you “Ask a Worthologist” to value an antique or collectible, you will receive three separate values, in addition to some interesting history, background and facts about the item. Why three values? Because professional appraisal guidelines state that appraised values are always dependent on the reason for the appraisal.

To help understand the difference in values, we’ll take a first edition of “The Wonderful Wizard of Oz,” for an example. That book was written in 1899 by L. Frank Baum, illustrated by W. W. Denslow and published in 1900 by George M. Hill. Approximately 35,000 copies were produced, with some variations (or states) based on corrections and changes made during the print run. For our example, we’ll assume that the book is in very good condition, has not been restored and is a second state.

Let’s say you want an appraisal of the book for insurance purposes in case your house burns down or the book is stolen. In that case, the appraiser must determine what it would cost for you to replace the book (in a similar condition and state). The appraiser will have to search bookseller catalogs, advertising lists and antiquarian bookstores to see who has the title for sale and what they are asking for it. The result is called “Replacement Cost” and would probably range between $5,000 and $10,000.

The first edition of L. Frank Baum's "The Wonderful Wizard of Oz" in very good condition. An unrestored second state can be valued three different ways, ranging from $10,000 to $1,000. This is common for all appraised items.

Alternatively, let’s say you want an appraisal for that book because a) you are going to donate it to a charity and want to deduct the donation on your taxes, or b) you have inherited it from a relative and you have to pay estate tax on the value.

The Internal Revenue Service requires that this appraisal be based on “Fair Market Value.” That means that the appraiser must research past comparable sales for the book and determine what it actually sold for in a fair and open market (where both the buyer and seller were fully knowledgeable about the book and could transact at their discretion). Current market trends, buyer’s premiums, shipping costs, selling locations, dates of sale and other factors all come into play. “Fair Market Value” is also used for appraisals when an equitable division of assets is required (such as in a divorce case). In WorthPoint terminology, this is called “Auction Value” and would probably range from $3,000 to $5,000.

Now, let’s say you just want to know the value of the book, for no other reason than your own information—maybe you are thinking about selling it. Guidelines state that somewhat less research is required. If you took this book to a volume used book dealer, he would not pay you “Fair Market Value” for the book because he needs to be able to (hopefully) resell it, cover his expenses and still make a profit. Instead, he will pay you “Market Value” for the book. This is what you will get if you don’t want to research, list with an auction house, package and ship, advertise, pay seller’s fees, rent space at a retail venue or other such efforts. WorthPoint calls this “Quick Sale” and it would probably be around $1,000.

Believe it or not, there is actually another legitimate appraised value that is even lower, although WorthPoint does not include it in their valuations. If the courts seize your assets due to bankruptcy or other legal action, your book might be sold in a distress sale for pennies on the dollar. In this case, an appraisal might be required to determine liquidation value.

Liz Holderman is a Worthologist who specializes in collectible books.

Dirty Old Furniture Finish: Is It ‘Grunge’ or Is It Patina?


by Fred Taylor (05/26/09).

A few years ago I had an elderly lady walk into my antique furniture restoration shop with an unusual request. In a slightly embarrassed manner she told me that she knew this was a professional shop and this was how I made my living, but just this once would I sell her just a little of the “patina” that real pros use. Believe me, if I had had some extra I would have given it to her.

How many times have you heard an appraiser on TV or an auctioneer in person use the term “patina” in describing an antique piece of anything, be it furniture, jewelry clothing, whatever? But if you were able to stop them in mid-sentence could they, in fact, precisely define the word for you? Probably not. As it turns out, the definition of patina is a lot like the definition of pornography. It’s hard to say what it is but you know it when you see it.

There is even discussion about how the word is pronounced. My ancient “American College Dictionary” by Random House places the emphasis on the first syllable so the word is “PAT-ina.” So does the “Columbia Encyclopedia,” Sixth Edition, 2001. In everyday use however, many people—including me—rightly or wrongly, put the emphasis on the second part of the word so it is “pa-TINA.” It doesn’t matter as along as we all know what it means. Or don’t know what it means, as the case may be.

So what does it mean? To some people, the answer is a simple two words: “old dirt.” But that is too simple and not entirely correct. My antique dictionary defines it as a film or encrustation on the surface of an object indicating great age. That’s a good start, but with furniture I think it involves a great deal more than that. The “Encyclopedia of Furniture,” by Joseph Aronson, defines it as “Color and texture of the surface produced by age and wear. In wood furniture the varnish, shellac or oil has a tendency to deepen yet retains transparency; edges wear smooth and sharp outlines are softened.” Now we are getting somewhere.

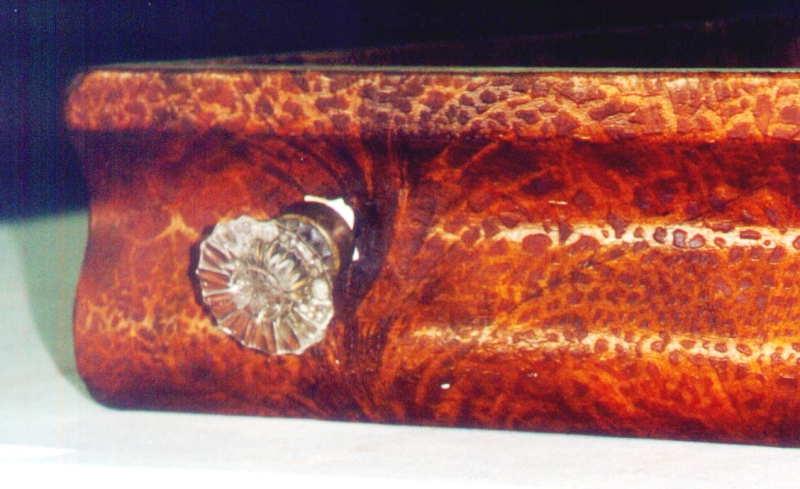
The crackled old shellac finish on this early 19th-century drawer is certainly original and probably qualifies as “patina,” but is it desirable?

The crackled old shellac finish on this early 19th-century drawer is certainly original and probably qualifies as “patina,” but is it desirable?

But that still doesn’t quite cover it. All of those characteristics can be duplicated to some degree by an experienced finisher, so there must be more to it than that. But at least Aronson tried. Many antiques reference books either avoid the subject altogether because it is so hard to handle concisely and accurately, or else they just gloss over it. An example of that treatment can be found in “American Furniture,” by Marvin D. Schwartz, which states that patina is the “Mellow and worn aspect a surface acquires through age; highly desirable quality on most antique furniture.” That steps nicely around it.

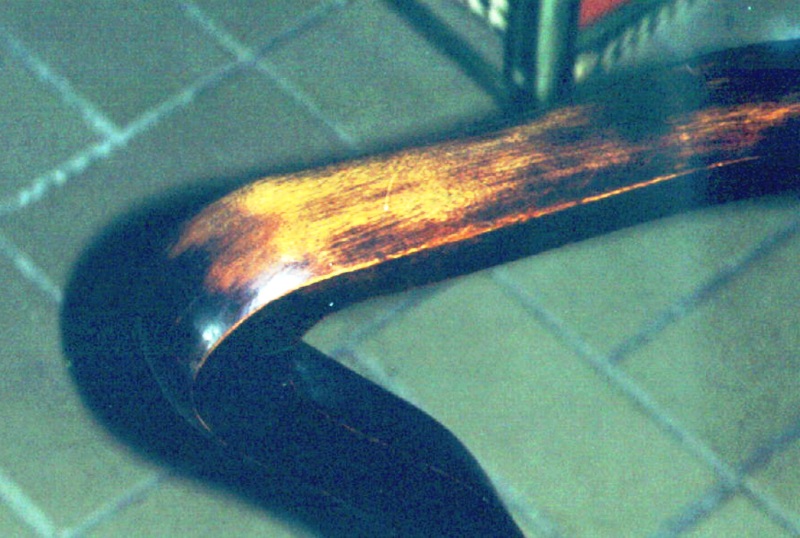
The color on the arm of this birch chair with a mahogany finish is certainly worn. Is this patina? Would you like it on your chair?

The color on the arm of this birch chair with a mahogany finish is certainly worn. Is this patina? Would you like it on your chair?

John Obbard, in his recent book “Early American Furniture” (Collector Books, 2000), gets a little more precise in saying “Patina is the cumulative effect of age, sunlight, wear and grime on old surfaces of wood and metal …” The “Antiques Roadshow Primer,” by Carol Prisant (Workman, 1999), takes a more humanistic approach. It says patina is “the sheen on a surface caused by long handling …” and that it is “… the accumulation of wax, soil, stains and oils that human hands have left on furniture over the course of many years, have created a smooth film of, well, dirt.” There we have the short of it again—dirt, and we humans are to blame; not sunlight, humidity or atmosphere.

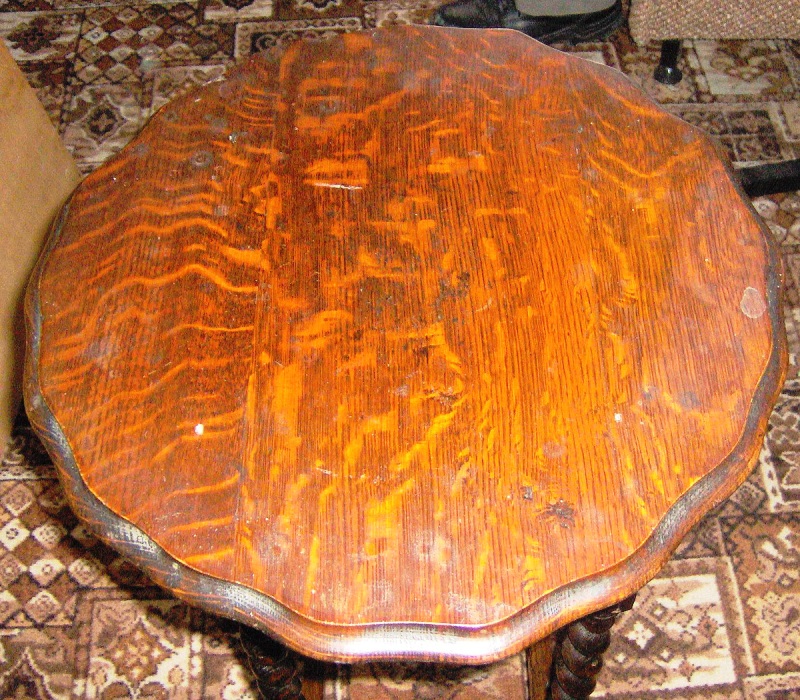
This turn-of-the-century oak table top sure looks-well worn by long handling – and abuse. It still probably qualifies as having patina.

This turn-of-the-century oak table top sure looks-well worn by long handling – and abuse. It still probably qualifies as having patina.

So, by the definitions of the trade, a piece that has patina is dirty, oily, grimy, worn, beat up, faded, rounded and generally disagreeable. By those standards, I have some extremely patinated sneakers. Surely that can’t be the whole thing.

It turns out that patina, whatever it is, has not always been universally desirable. Surely Goddard, Phyfe, Belter and Jellif did not send out their masterpieces all dirty and grimy. They were shiny and clean, new and fresh, and 20 or 30 years ago that was the way much of the antiques trade—including some museum curators—preferred their antiques. And that’s the way many buyers wanted their new old pieces to look. They didn’t want all that dirty old stuff in their new dining room or bedroom, with a crackly old dark finish that could be hiding almost anything, especially the beauty of 200-year-old mahogany. The current emphasis on originality and patina is just that; current. It wasn’t the case 30 years ago and may not be the case 30 years from now.

Perhaps the definition of patina is not as important as we thought it was. Perhaps patina, which, in and of itself, is not always a beautiful thing, judging by the industry definitions, should just be regarded as one more tool of the inquiring collector, used to verify the apparent age of a piece.

Next time you are tempted to discuss the patina of a piece with a dealer or auctioneer, just ask yourself, “Does the piece LOOK, SMELL and FEEL old?” That may be the best definition of all.

Fred Taylor is a Worthologist who specializes in American furniture from the Late Classicism period (1830-1850).

Visit Fred’s website at www.furnituredetective.com. His book “How To Be A Furniture Detective” is now available for $18.95 plus $3 shipping. Send check or money order for $21.95 to Fred Taylor, PO Box 215, Crystal River, FL 34423.

Fred and Gail Taylor’s DVD, “Identification of Older & Antique Furniture,” ($17 + $3 S&H) and a bound compilation of the first 60 columns of “Common Sense Antiques,” by Fred Taylor ($25 + $3 S&H) are also available at the same address.

Thursday, August 5, 2010

Preparing Pets for a Natural Disaster


Natural disasters come in many shapes and sizes. From hurricanes to tsunamis, earthquakes to severe lightning, these ferocious acts of nature can devastate our lives and the lives of our pets.

In 2005, Hurricane Katrina ravaged the nation with one of the costliest and deadliest hurricanes in the history of the United States. In addition to countless people, thousands of pets were left stranded and homeless and many died.

It’s important to learn from the historical path of destruction Katrina left behind. While there is little we can do to prevent a natural disaster, we can, however, protect our pets by preparing for some of them. North Shore Animal League America has created a disaster preparedness kit for animals. It may possibly save your pets’ lives one day.

  • Ensure that all pets have proper identification tags listing their name, owners name, address and phone number **be sure to include a cell phone number**
  • Current rabies tag on collar
  • Current license tag on collar (for canines)
  • Consider microchipping your pet to serve as a back up source of identification should the collar and tags become lost/damage. Be sure to register and activate chip with company
  • Current photographs of all pets (including a close up of their face and one of their full body) with detailed descriptions of special markings and distinguishing features – also consider laminating photos to help protect them from the elements
  • Copies of current veterinary history including medical conditions, vaccination information, prescription medications with dosing and frequency
  • Copies of pre-made LOST PET signs with your animals photo, description and emergency contact information (include your cell phone and phone numbers of other possible contacts) – laminating signs will help protect them from the elements
  • One month supply of your pets current prescription in waterproof containers clearly labeled with name of pet, name of medication and current dosing
  • Monthly dose of heartworm medication and flea/tick medication
  • Extra collars, harnesses, leashes and ID tags
  • A muzzle – in case your pet is injured or frightened and needs to be handled by rescue workers or a veterinarian
  • Containment system to securely and safely transport and temporarily house your pet – this could include a pop-up crate, exercise pen with cover or a standard pet carrier
  • Poop pick up bags or litter box
  • Paper towels
  • Waterless antiseptic hand wash for humans
  • Supply of bottled water
  • Supply of canned and dry food that your pet currently eats – remember that drastic dietary changes can result in gastrointestinal upset for your pet
  • Manual can opener
  • Food and water bowls
  • Phone numbers of local veterinarians, emergency hospitals, boarding kennels, animal shelters and humane societies
  • Emergency contact numbers for alternative caretakers should you yourself become incapacitated or unable to care for you pet
  • Flashlight with fresh batteries
  • Tools – including scissors, tweezers and a thermometer
  • Grooming supplies:
    ~ waterless shampoo
    ~ baby wipes
    ~ brush/comb
  • First aid supplies:
    ~ hydrogen peroxide
    ~ povidone iodine solution (or other antiseptic)
    ~ alcohol
    ~ triple antibiotic ointment for cuts/scrapes
    ~ sterile eye wash
    ~ artificial tears or eye lubricant
    ~ instant ice packs
    ~ gauze squares and cotton balls
    ~ non-adherent dressing (telfa pad or equivalent)
    ~ roll gauze
    ~ conforming bandage (self–adherent)
    ~ adhesive bandaging tape
    ~ latex gloves
  • Waterproof carrying case for supplies - a fishing tackle box is helpful to keep kit organized, clean and dry

Friday, March 12, 2010

CAL FIRE Urges Californians to
Change Your Clocks, Change Your Batteries
Sacramento – With the switch to Daylight saving time this Sunday, March 14, CAL FIRE and the Office of the State Fire Marshal are reminding all California residents to change their smoke alarm batteries when setting their clocks.
Every year, lives are lost due to inoperative smoke alarms. More than 66 percent of home fire deaths that occurred between 2003 and 2006 were in homes without a working smoke alarm, according to the National Fire Protection Association. The changing of the clocks provides an ideal reminder to change your smoke alarm batteries at least twice a year.
“With proper maintenance and regular testing, smoke alarms play a pivotal role in the early notification of a fire emergency,” said Chief Tonya Hoover, acting state fire marshal. “By taking just a few seconds each year to replace the battery, you can truly make a difference in protecting your family and your home.”
CAL FIRE has the following tips on smoke alarms:

Test smoke alarms once a month.

Replace batteries in all smoke alarms twice a year.

Don’t “borrow” or remove batteries from smoke alarms even temporarily.

Regularly vacuum or dust smoke alarms to keep them working properly.

Replace smoke alarms every 10 years.

Don’t paint over smoke alarms.

Practice family fire drills so everyone knows what to do if the smoke alarm goes off. Smoke Alarms Save Lives Fact Sheet
Change Your Clocks & Check Your Smoke Alarm Fact Sheet
Find more information visit the CAL FIRE Web site at www.fire.ca.gov.

Wednesday, February 10, 2010

Where Can I Donate or Recycle My Old Computer and Other Electronic Products?

Find a Local Program Exit EPA

  • Earth 911
    Earth 911 is a comprehensive communication medium for the environment. Earth 911 has taken environmental hotlines, web sites and other information sources nationwide, and consolidated them into one network. Once you contact the Earth 911 network, you will find community-specific information on eCycling and much more.

  • My Green Electronics
    Provided by the Consumer Electronics Association, this site is a resource for consumers wishing to purchase green products and/or searching for local opportunities to recycle or donate used electronics.

  • Electronic Industries Alliance's Consumer Education Initiative
    The Electronic Industries Alliance's eCycling Central Web site helps you find reuse, recycling and donation programs for electronics products in your state.

  • TechSoup
    TechSoup has compiled a comprehensive body of information to promote computer recycling and reuse. This site provides resources for those who would like to donate hardware, those who would like to acquire recycled hardware, and refurbishers.

  • Rechargeable Battery Recycling Corporation (RBRC)
    RBRC can help you recycle portable rechargeable batteries commonly found in cordless power tools, cellular and cordless phones, laptop computers, camcorders, digital cameras, and remote control toys. Search for collection sites by zip code.

Protect metal surfaces on Fire and Water Loss Jobs

Boeshield T-9® was developed and licensed by The Boeing Company to fill their need for a superior lubricant/protectant.

The formulation, based on a unique combination of solvents and waxes, is designed to penetrate metal pores and dissolve minor corrosion, then leave a resilient waxy coating that lasts for many months.

We began by successfully introducing Boeshield T-9® to the tough saltwater marine market for lubricating and protecting all metals. It works well on engines and deck hardware as well as electronics, batteries and wiring connections. It is non-conductive and will not cause short circuits.

For bicycle chains, T-9® has proven to be a tough, long lasting waterproof lubricant. Our sales keep growing every year despite many competitors.

On woodworking tool surfaces Boeshield T-9® recently topped all other surface treatments in Wood Magazine's article on Rust Busters*. According to them: “Except for the section treated with Boeshield T-9® all sections have completely rusted over”. “There is only one choice for protectant as far as we’re concerned: Boeshield T-9®”.

We feel we have the best product of its type on the market. In fact, if you think you’ve found a better penetrating lubricant and protectant, let us know, and we will refund your purchase price.


* Penetrates deeply into fasteners and fixtures.
* Displaces moisture.
* Dries to a clean waxy film.
* Lubricates and protects all metals for months.
* Will not harm paints, plastics, rubber or vinyl.
* Attacks existing corrosion.
* T-9® will also loosen rusted parts.
* Contains No Fluorocarbons
* Many Industrial and Household uses.

® Trademark and Technology owned and licensed by
THE BOEING COMPANY

Thursday, January 28, 2010

10 Worst Germ Hot Spots
Locations that may surprise you—and how to make a clean sweep

By Alyssa Shaffer
Win the War on Germs
1. Kitchen Faucet
2. Garbage Disposal
3. Welcome Mat
4. Vacuum Cleaner
5. Dish Towel
6. Car Dashboard
7. Soap Dispensers
8. Restaurant Ketchup Bottle
9. Refrigerator Seal
10. Cell Phone
Win the War on GermsYou may scrub your toilet and countertops until they shine, but these scary new bacteria breeding grounds require just as much attention.
Germs (the catchall name for bacteria, viruses, and other microorganisms) are everywhere--at home, in the office, even in your car. Luckily, about 99% of them can't harm us. But the other 1% can be annoying, uncomfortable, or downright scary: Most of these pathogens are either viral or bacterial and can cause everything from a runny nose to a potentially life-threatening infection. You may think you know the obvious places that germs propagate--the doctor's office, the soles of your shoes--but many more germ-friendly locales are completely unexpected yet no less dangerous. We uncovered a host of surprising new spots where germs like to lurk, and offer easy solutions to keep you and your family safe and healthy. Click here for the whole story: http://www.prevention.com/10worstgermspots/

Saturday, January 23, 2010

OSHA eTools and Electronic Products for Compliance Assistance

OSHA eTools and
Electronic Products for Compliance Assistance


OSHA recognizes the utility of distributing information through the Internet and CD-ROMs.
The following electronic products for compliance assistance are available:

eTools, Expert Advisors, eMatrix

eTools are "stand-alone," interactive, Web-based training tools on occupational safety and health topics.
They are highly illustrated and utilize graphical menus.
Some also use expert system modules, which enable the user to answer questions,
and receive reliable advice on how OSHA regulations apply to their work site.

Expert Advisors are based solely on expert systems.

Selected eTools are available as downloadable files for off-line use.

eTools Ergonomics eTools eTools en Español Expert Advisors eMatrix


www.osha.gov www.dol.gov

Monday, January 18, 2010

Track It Back - Recover Lost Electronics

Special Report:

See TrackItBack in action on the streets of Chicago

Two cell phones, purposely lost in downtown Chicago. Using hidden video cameras, watch as a third party records what happens next. Will the phones be found and returned? See for yourself!

http://www.trackitback.com/us/testimonials.html


Saturday, January 16, 2010

Sesame Street Fire Safety Station Curriculum

Sesame Street Fire Safety Station Activity Book

This activity book and the accompanying audiocassette of songs and stories helps educators reach preschoolers with simple, memorable fire safety messages. Both have been created with the resources and expert guidance of the USFA and Sesame Workshop™.

The original Sesame Street Fire Safety Station project began in 1979 and has been well-recognized for its effectiveness in reaching and teaching preschoolers. We’ve updated and examined upon this information to bring you Sesame Street Fire Safety Station. Whether you’re a teacher, child care provider, fire safety educator, firefighter, nurse, or burn center administrator, these materials will support your preschool fire safety education efforts. Use them to form the core of your program or to supplement what you’re already doing in this regard. The book and audio cassette have both been designed to be effective in one-time teaching situations or on an ongoing basis. We hope Sesame Street Fire Safety Station will make preschool fire safety education easier for you and more fun for everyone.

Order Information

The kit is only available to preschools, fire departments and individuals who home school or teach young children. Requests from schools, fire departments and other organizations must be faxed on organization letterhead to (301) 447-1213. Home school requests may be made by calling (301) 447-1189. USFA reserves the right to limit order quantities.

Free Fire Safety Info For Kids - FREE DOWNLOADS


http://www.firesafety.gov/kids/flash.shtm

http://www.usfa.dhs.gov/downloads/pdf/publications/fa-176.pdf

http://www.usfa.dhs.gov/downloads/pdf/publications/fa-295-press.pdf

http://www.fema.gov/kids/tsunami/

Monday, January 4, 2010

Water rings
Do your wood end tables or coffee tables have rings from water glasses being set down? Using one cup of vinegar with one cup of olive oil rub with the grain on your wood furniture you can make the stain disappear.

How to Clean Vintage Costume Jewelry

By Jerrie Dean

Vintage Costume Jewelry needs special attention when you clean it. Read on for tips on how to clean your costume jewelry.

Step 1
  1. Some costume jewelry will turned green. This is called verdigris and is a patina that occurs on copper, brass or bronze over time and can appear on your vintage costume jewelry because it was made with these metals in it. It is not something that you want to leave on your jewelry as it will start to decay it. Ketchup and vinegar can be used, but I think that lemon juice is better. You can use a q-tip or soft toothbrush to help get to the hard to reach places. You may find that the finish has been compromised from the vendigris, but that is better than loosing the piece to decay.

  2. Step 2

    Scratching can ruin the old stones in your piece and make it look dull. To keep it looking like new always store it so that it isn't touching your other jewelry or wrap it with a old wash cloth. Zip lock bags work well for storage, too. If you have a room, displaying your jewelry in a curio cabinet is a great idea.

  3. Step 3

    Vintage costume jewelry are usually set with prongs but some may still have glue to keep them in. You want to be careful and look at your piece before you put it in a jewelry cleaner full of jewelry cleaning solution. It will soften the glue. You particularly want to be careful with pieces that have colored backing as this will chip away or dissolve. Also, any pieces that are faux pearls will loose their outter shell or chip away and be ruined if put in water or any cleaning solution.

  4. Step 4

    If your decide that your jewelry does meet the above criteria and you cannot soak it in a jewelry cleaning solution , then use a q-tip or soft toothbrush and the cleaning solution to clean your jewelry.

  5. Step 5

    Finish up by using a very soft jewelry cleaning cloth to make your jewelry glow.

  6. Step 6

    Make sure your jewelry is completely dry before you put it away as moisture is what causes verdigris.

Tuesday, December 29, 2009

With cold winter weather comes an increasing risk for chimney fires.

'Tis the season for chimney fires

By KATU.com Staff and News Sources

PORTLAND, Ore. - Story Published: Dec 15, 2009 at 3:53 PM PST

With cold winter weather comes an increasing risk for chimney fires.

In the past few months, the McMinnville Fire Department alone has responded to a half dozen chimney fires, "most of which started due to a lack of proper maintenance," reports McMinnville Fire Marshal Eric McMullen.

The McMinnville Fire Department and the Chimney Safety Institute of America offer the following tips for preventing chimney fires and keeping carbon monoxide out of your home:

  • Get an annual chimney check. Have chimneys inspected annually, and cleaned as necessary. This reduces the risk of fires and carbon monoxide poisonings due to creosote buildup or obstructions in the chimneys.
  • Keep the roof clear. Keep tree branches and leaves at least 15 feet away from the top of the chimney.
  • Install a chimney cap. This keeps debris and animals out of the chimney.
  • Choose the right fuel. For burning firewood in wood stoves or fireplaces, choose well seasoned wood that has been split for a minimum of six months to one year and stored in a covered and elevated location. Never burn Christmas trees or treated wood in your fireplace or wood stove.
  • Build it right. Place firewood or fire logs at the rear of the fireplace on a supporting grate. To start the fire, use kindling or a commercial firelighter. Never use flammable liquids.
  • Keep the hearth area clear. Combustible material too close to the fireplace, or to a wood stove, could easily catch fire. Keep furniture at least 36 inches away from the hearth.
  • Use a fireplace screen. Use metal mesh or a screen in front of the fireplace to catch flying sparks that could ignite or burn holes in the carpet or flooring.
  • Install smoke and carbon monoxide detectors.
  • Supervise children and pets closely around wood stoves and fireplaces.

McMullen recommends that open masonry fireplaces should be cleaned as soon as the soot is 1/4 of an inch thick. Brick fireplaces should be cleaned even sooner if the soot forms a glossy, rock-like substance known as glaze.

McMullen said factory-built fireplaces should be cleaned "when any appreciable buildup occurs." Even the smallest level, he said, "is considered to be enough fuel buildup to cause a chimney fire capable of damaging the chimney or spreading to the home."

27 Ways to Clean with Baking Soda

Lots of green cleaning power in a little orange box
by Noël-Marie Taylor
There are many non-poisonous products that can be used for basic household cleaning. Next to vinegar, the most useful of these is baking soda.

Like vinegar, baking soda has three major things going for it as a cleanser:

  • It's non-toxic. Sure, eaten in large amounts it might make you feel unpleasant, but it's not poisonous.
  • It's multi-purpose. The suggestions in this article are only a few of the many ways that baking soda can be used as a household cleanser.
  • Best of all, it's CHEAP! The cost of baking soda (especially when purchased in several pound large boxes) is far less than that of any other, specialized cleaning agent.

Baking soda (or bicarbonate of soda, as it is also known) is a naturally occurring material, present in most organic life forms. It can be "made" from sodium carbonate, or soda ash. The soda ash is dissolved in a carbon dioxide rich solution, and sodium bicarbonate (baking soda) precipitates out.

As its name suggests, baking soda can be used for cooking. It can also be used medicinally, and, as we will discuss in this article, for cleaning.

In the kitchen
The kitchen is the most likely place to find baking soda. Don't stop with using it for baking, though!

1. A box or small bowl of baking soda in the refrigerator, freezer, or any cupboard will keep away unpleasant odors.

2. Similarly, baking soda will keep away garbage odors; sprinkle the bottom of the pail, and then sprinkle again after you put a new bag in.

3. Grease fires can be put out by sprinkling them with baking soda.

4. To clean surfaces, sprinkle baking soda on a damp cloth. Wipe, then rinse with clean water.

5. To remove stale smells from food containers, rinse out with hot water and baking soda. If the smell persists, let the container soak overnight in the baking soda and water mixture.

6. To clean silver, use a paste of 3 parts baking soda to one part water. Rub the paste onto each item, then rinse with warm water and dry with a soft cloth.

7. To remove scuff marks or grease spills from the floor, sprinkle with baking soda and then wipe with a warm, damp cloth. This is even safe for no-wax floors!

8. For burnt-on food in the bottom of pots, sprinkle with baking soda, then add hot water. Let soak overnight; the dried on food will come loose much more easily.

In the Bathroom

9.To remove stubborn stains from most surfaces, use a baking soda paste (3 parts baking soda, one part water). Apply, let stand, then scrub or wipe clean.

10. Hairbrushes and combs can be cleaned in a baking soda solution.

11. To avoid clogged drains, pour 1/4 cup baking soda down weekly. Rinse through with hot water.

All Around the House

12. To remove scents from a carpet, sprinkle with baking soda. Let stand for at least fifteen minutes, then vacuum. Repeat as needed.

13. If there is a smoker in the house, put baking soda in the bottom of each ashtray to keep away some of the stale smoke smell.

14. Baking soda in the litterbox will help prevent odors.

15. To quickly clean pets and remove "wet dog" odor, sprinkle with baking soda and brush out their fur.

16. To help remove spills, blot as much as possible. Then clean as you normally would. When finished, sprinkle with baking soda. Vacuum. This will decrease the chance that some of the spilled item will remain in the carpet and cause unpleasant odors later.

17. Children's toys can be cleaned using 1/4 cup baking soda in 1 quart warm water. Submerge in this mixture (or wipe with a cloth dampened in it), then rinse with clear water.

In the Laundry

18. Replace half of each measure of laundry detergent with baking soda to keep clothing fresh.

19. To remove grease stains, either add baking soda to the wash load or pretreat the stains with a baking soda paste.

20. Pretreat diapers in their pail with baking soda. This will keep odors from becoming overpowering between washings.

21. Baking soda increases the effectiveness of chlorine bleach. Add 1 / 2 cup to your laundry, along with the usual amount of bleach.

22. If you keep a laundry hamper, add some baking soda every day to keep the hamper from smelling between emptyings.

Outside the House (Yard and Garage)

23. Baking soda can be used to help clean up grease spills.

24. To remove burnt food from the grill, sprinkle with baking soda, then soak. After several hours, the charred pieces will come loose easily.

25. Lawn furniture can be easily cleaned with a rinse of 1/4 cup baking soda in 1 quart warm water.

26. The children's pool can be cleaned and have mildew removed by washing with baking soda in warm water.

27. Before packing away your camping gear after a trip, sprinkle with baking soda.

If you really get into using baking soda for cleaning, consider buying it in bulk; see if you can join a co-op or if your local natural foods or bulk store can order it for you. After all, it doesn't spoil, and the uses for baking soda are nearly endless!


Noël-Marie Taylor is a freelance writer located in Columbia, Maryland. Her work has appeared in many magazines, including PC Magazine and The Mother Is Me. A stay-at-home mom to two children, she is also the designer of several cross-stitch kits for children.

Thursday, December 24, 2009

Pop the Bubble Wrap Game

http://www.sealedair.com/products/protective/bubble/funstuff/game/

Tuesday, December 22, 2009

Water Exposure on Electronic & Mechanical Equipment - Emergency Tips and Indicators of Water Damage.

While the damages associated with water exposure to energized electronics are well known and generally obvious when encountered, the effects of passive water exposures and residues left behind are commonly unknown or unnoticed by those without extensive experience or training. It is a popular misconception that electronic equipment exposed to water is permanently damaged. In general, water exposure to electronic or mechanical equipment that was not energized can usually be restored to “pre-incident” condition by employing industry-standard restoration techniques. In many incidents, even equipment that has been totally submerged can be restored. However, in every case of water exposure to equipment assets, TIME IS OF THE ESSENCE - immediate countermeasures must be initiated to minimize the progressive damages associated with water exposure.

Unless the incident occurred in a laboratory environment, very few water exposure incidents involve pure water. Almost all sources of water contain contamination that is commonly deposited on exposed surface areas – especially when the water passes through building materials. Many of the residual contaminates are potentially damaging to critical components and unprotected surfaces. While theoretically, the water’s ionic content, acidity, suspended solids and organic content could be analyzed to determine the corrosive and/or conductive potential of possible residues, it is generally not necessary or even practical to do so. At minimum, however, the residual contamination introduced by the water should be tested to determine whether the deposits appear to be corrosive, conductive and/or abrasive. In addition, areas that have had standing water or moist/humid conditions for an extended period of time (over 48 hours) must also be considered for the risk of mold and mildew spores – which is more of a health hazard than capacity to inflict damage to electronic components.

Ultimately, equipment assets exposed to water must be inspected by a qualified person to determine whether moisture has entered electronic or electrical enclosures susceptible to actual damage. If there are any indications of potential damage, the equipment should be professionally serviced prior to testing or re-commissioning. The following offers a basic structure and methodology to assess actual and potential damages to equipment assets exposed to water.

1. NEVER power-up or energize any equipment exposed to water - Permanent damage will likely occur! DO disconnect all power supplies (including Uninterruptible Power Supplies - UPS) IMMEDIATELY! Pay particular attention to equipment that has capacitors, which retain an electrical charge - some residual charges can be lethal.

2. Remove all accessible doors and cabinet panels to facilitate the drying process. Utilize fans to circulate air through the affected equipment. Hair dryers and/or electric heat guns may be used, but with extreme caution due to the possibility of introducing excessive temperatures.

3. Remove standing water from framework and chassis floor with the assistance of towels, sponges and wet/dry vacuums.

4. When possible, utilize blotting material (high absorbent/lint-free paper towels) to remove water from critical surface areas. If necessary, use compressed air (less than 50 psi) to facilitate water removal from inaccessible areas (working from top to bottom).

5. Equipment that was submerged or remains saturated and exhibits “dirty” water residues (mud/silt, debris, soot, etc.) should be flushed with clean water prior to drying to minimize damage and expedite the subsequent assessment/recovery efforts.

6. Wipe, or lightly spray, rust inhibiting oils to all exposed metal surfaces to prevent flash rusting. Avoid the use of oils or solutions containing silicone; while effective in displacement of moisture, silicone can cause problems with connectors and could interfere with subsequent refinishing of metal surfaces.

7. Use electronic-grade contact sprays containing lubricants on electrical connections and critical surface contact areas.

8. Never force mechanical fittings or switches/potentiometers that are stuck.

9. Considerations must be given to ALL the components in the electrical system (e.g., conductors, conduits, control boxes, connections in junction boxes, terminal strips/punch-down blocks, etc.).

10. If the affected equipment needs to be covered for protection after extracting the water, do NOT tightly wrap or enclose equipment with plastic. Ensure that the equipment receives adequate air circulation to prevent reintroduction of water via condensation buildup.

11. Either remove the equipment assets to a controlled environment or contain the ambient environment. The basic idea is to provide an environment for the equipment of about 70ºF and 40% RH.

12. Attempting to dry the equipment in-place requires specialized techniques to ensure complete drying and eliminate possible problems with residual moisture in insulators and contact surfaces. Likewise, equipment containing non-hermetically sealed (open) relays and transformers require specialized drying prior to application of power. Seek professional assistance.

13. Consider the use of high-volume air filtration units (“air scrubbers”) to combat the buildup of dust and debris that become airborne while drying the facility or during reconstruction. Residual debris may result in a loss of dielectric spacing within the equipment, and present a hazard upon applying power to the equipment.

14. If media materials (e.g., computer drives/tapes/diskettes) are exposed to water, do not dry or wipe. Place the affected media in a sealed container and seek professional assistance. Computer hard drives that are exposed to water must NOT be powered until addressed by a professional.

15. Abrasives such as steel wool or sandpaper should not be used to clean current-carrying parts of the equipment. These materials may remove plating or other conductive surfaces from the parts and may result in hazards when the equipment is re-energized.

Visual Effects of Water Exposure:

While the initial assessment reports ideally provide a reference map to identify the equipment assets actually exposed to water, detailed follow-up inspections are normally required to isolate and identify component-level exposures and possible damage. Many times, however, the follow-up inspections are initiated after the most obvious signs of water exposure are no longer present or are masked by other post-incident conditions. Accordingly, the following visual indicators of water exposure are offered to assist in the inspection process:

1. White salt and/or oxide deposits on interior metal Chassis or critical contact areas (especially at connection points of dissimilar metals).

2. Water stains and/or rusting on interior/exterior panels (use a flashlight at low angles to reveal possible water marks).

3. Linear concentrations (“tide lines” or unusual matting) of dust or debris.

4. Moisture inside meter housings and other electromechanical devices enclosed in transparent plastics/glass (e.g., low voltage relays, switches, timers, etc.).

5. Peeling and discoloration of adhesive attached paper labels, and/or smearing of ink.

6. Loose white surface oxide deposits on aluminum fixtures (a flashlight used at low angles is especially effective here).

7. Surface rusting on exposed unprotected metal surfaces (especially fasteners such as screws and threaded holes).

8. Abnormal resistance or friction on adjustable control units and manual switches.

General Equipment Recovery Notes:

Electronic Devices - Since the largest factor in determining whether electronics are actually damaged by water exposure is contingent on whether the unit was energized, the first priority in conducting an assessment is to identify the units that were energized (even if in “standby” mode) at the time of the incident. Seek specialized assistance with the units that were energized when exposed to water – it may be possible to obtain a general prognosis of the unit before investing additional time/expenses on subsequent recovery efforts. If appropriately preserved in a timely manner and processed in accordance with industry-standard restoration techniques, most electronic devices/equipment that not energized at the time of exposure to water are candidates for successful restoration by a qualified specialist.

Motors - Water exposed/submerged electrical motors are routinely refurbished by firms specializing in motor repairs. The process generally involves disassembling, cleaning (power washed), rinsing, bake out, re-assembling (generally replacing the bearings and brush holders, as required) and testing (verifying the required resistance readings on the windings). In general, the costs to restore small and fractional horsepower motors may approach or exceed actual replacement value and is thus not recommended.

Breakers - Most large capacity breakers (that were not energized when exposed) can be restored. Smaller capacity breakers (molded case types) that exhibit evidence of interior water intrusion are generally candidates for immediate replacement.

Surface oxidation of Metal Surfaces - While most surfaces that are reasonably protected (painted, plated, anodized, lubricated, etc.) will not exhibit surface oxidization (corrosion) from short durations of exposure to water, an exception to this rule is found in equipment that was electrically energized when exposed to water. Keep a close lookout for such tell-tale signs - this could indicate over-voltage damage to sensitive electronic components. Likewise, the possibilities of electrolytic and/or galvanic reactions are generally increased when energized equipment is exposed to water and could manifest in distinctive corrosive damage.

Electrical bus bars and switchgear - Unless the bus and switchgear were energized when exposed to water, the probability of recovery is high provided the affected equipment is reasonably preserved and treated following the incident. Removal of surface oxidation, corrosion protection of connections and re-lubrication is part of the restoration process.

Transformers - In general, many “dry type” transformers with insulated windings that are topically exposed to limited water (not submerged) are candidates for successful restoration. Similar to electric motors, resistive testing of the windings will indicate whether the units are sufficiently dried after servicing. Sealed “wet type” and cast resin transformers are generally not affected and only require a simple wipe-down of exterior surfaces.

Mechanical Assemblies - Gate Valves, sealed gauges, pumps, conduits/pipes, etc. are typically unaffected by exposure to water, other than requiring a general topical cleaning. External pump shaft bearings and seals are generally replaced if they are susceptible to causing internal rusting.

Michael Mies

President/CEO Technical Recovery Solutions

http://tinyurl.com/ycq5t2v